|
|
Reset Map | Download PDF |

Other Photos:
2009-06-21 Flat Rock Ranch
Flat Rock Ranch is a private ranch near Comfort with some very nice trails on it. This is my absolute favorite place in the area to ride mountain bikes. Unfortunately, it's a bit of drive from my house, or I'd ride it all the time.
This map is somewhat different than my road ride maps since there is one long segment for each loop. This is because off-road rides don't tend to have identifiable intersections to make directions for. This map is really intended to show you the location of the course, give you an idea of trail lengths, and provide profiles to tell what you are getting into before you dive in.
Here's a link to the official web site for the ranch: http://www.flatrockranch.net/
The ranch is at the end of Flat Rock Creek Road. Go through the gate to the parking area, which is clearly marked. The ranch is at the end of Flat Rock Creek Road. Go through the gate to the parking area, which is clearly marked. The ranch is at the end of Flat Rock Creek Road. Go through the gate to the parking area, which is clearly marked.
| Ride Dist. | Type | Description |
|---|---|---|
| 0.0 | facilities | There are toilets, showers, hoses, tables, and much more near the parking area. There are good signs pointing the way to all the amenities. |
| Ride Dist. | Type | Description |
|---|---|---|
| 0.0 | facilities | There are toilets, showers, hoses, tables, and much more near the parking area. There are good signs pointing the way to all the amenities. |
| Ride Dist. | Type | Description |
|---|---|---|
| 0.0 | facilities | There are toilets, showers, hoses, tables, and much more near the parking area. There are good signs pointing the way to all the amenities. |
| 10.6 | facilities | There are toilets, showers, hoses, tables, and much more near the parking area. There are good signs pointing the way to all the amenities. |
| Help! |
| Total Miles | Instructions | For Miles |
|---|---|---|
| 0.00 | WEST from parking | 10.62 |
| 10.62 | Arrive at finish |
| Total Miles | Instructions | For Miles |
|---|---|---|
| 0.00 |
WEST from parking head North up the road a little until the trail branches off to the right. It'll be the second trail, since the first one is where it returns. Upper Loop The Upper Loop is all the trails located on the East side of the ranch. lanes: 1 shoulder: 0 traffic: None speed: 8 |
10.62 |
| 10.62 | Arrive at finish |
| Total Miles | Instructions | For Miles |
|---|---|---|
| 0.00 | WEST from parking | 14.80 |
| 14.80 | Arrive at finish |
| Total Miles | Instructions | For Miles |
|---|---|---|
| 0.00 |
WEST from parking Head through the gate, down past the house, across the creek, and up the trail. Lower Loop The Lower Loop is all the trails on the West side of the ranch. lanes: 1 shoulder: 0 traffic: None speed: 8 |
14.80 |
| 14.80 | Arrive at finish |
| Total Miles | Instructions | For Miles |
|---|---|---|
| 0.00 | WEST from parking | 10.63 |
| 10.63 | WEST from parking | 14.80 |
| 25.43 | Arrive at finish |
| Total Miles | Instructions | For Miles |
|---|---|---|
| 0.00 |
WEST from parking head North up the road a little until the trail branches off to the right. It'll be the second trail, since the first one is where it returns. Upper Loop The Upper Loop is all the trails located on the East side of the ranch. lanes: 1 shoulder: 0 traffic: None speed: 8 |
10.63 |
| 10.63 |
WEST from parking Head through the gate, down past the house, across the creek, and up the trail. Lower Loop The Lower Loop is all the trails on the West side of the ranch. lanes: 1 shoulder: 0 traffic: None speed: 8 |
14.80 |
| 25.43 | Arrive at finish |

| Ride Analysis | |||
|---|---|---|---|
| elevation change (feet) | distance (miles) | avg. grade (%) | |
| Climbing | 1394.26 | 4.17 | 6.3 |
| Descending | -1357.97 | 6.45 | -4.0 |
| Overall | 2752.23 | 10.62 | |
| Top 10 Climbs: | ||
|---|---|---|
| Rank | Gradient (%) | Distance (miles) |
| 1 | 6.7 | 0.14 |
| 2 | 6.5 | 0.13 |
| 3 | 5.1 | 0.27 |
| 4 | 3.8 | 0.14 |
| 5 | 3.6 | 0.15 |
| 6 | 3.3 | 0.23 |
| 7 | 3.2 | 0.24 |
| 8 | 3.1 | 0.17 |
| 9 | 3.0 | 0.17 |
| 10 | 2.6 | 0.14 |
| Segment Analysis | |||
|---|---|---|---|
| elevation change (feet) | distance (miles) | avg. grade (%) | |
| Climbing | 1394.26 | 4.17 | 6.3 |
| Descending | -1357.97 | 6.45 | -4.0 |
| Overall | 2752.23 | 10.62 | |
| Top 10 Climbs: | ||
|---|---|---|
| Rank | Gradient (%) | Distance (miles) |
| 1 | 6.7 | 0.14 |
| 2 | 6.5 | 0.13 |
| 3 | 5.1 | 0.27 |
| 4 | 3.8 | 0.14 |
| 5 | 3.6 | 0.15 |
| 6 | 3.3 | 0.23 |
| 7 | 3.2 | 0.24 |
| 8 | 3.1 | 0.17 |
| 9 | 3.0 | 0.17 |
| 10 | 2.6 | 0.14 |

| Ride Analysis | |||
|---|---|---|---|
| elevation change (feet) | distance (miles) | avg. grade (%) | |
| Climbing | 1769.36 | 5.35 | 6.3 |
| Descending | -1750.33 | 9.45 | -3.5 |
| Overall | 3519.69 | 14.80 | |
| Top 10 Climbs: | ||
|---|---|---|
| Rank | Gradient (%) | Distance (miles) |
| 1 | 7.2 | 0.19 |
| 2 | 6.7 | 0.15 |
| 3 | 4.6 | 0.20 |
| 4 | 4.6 | 0.20 |
| 5 | 4.0 | 0.20 |
| 6 | 3.9 | 0.14 |
| 7 | 3.8 | 0.23 |
| 8 | 3.6 | 0.14 |
| 9 | 3.5 | 0.39 |
| 10 | 2.7 | 0.15 |
| Segment Analysis | |||
|---|---|---|---|
| elevation change (feet) | distance (miles) | avg. grade (%) | |
| Climbing | 1769.36 | 5.35 | 6.3 |
| Descending | -1750.33 | 9.45 | -3.5 |
| Overall | 3519.69 | 14.80 | |
| Top 10 Climbs: | ||
|---|---|---|
| Rank | Gradient (%) | Distance (miles) |
| 1 | 7.2 | 0.19 |
| 2 | 6.7 | 0.15 |
| 3 | 4.6 | 0.20 |
| 4 | 4.6 | 0.20 |
| 5 | 4.0 | 0.20 |
| 6 | 3.9 | 0.14 |
| 7 | 3.8 | 0.23 |
| 8 | 3.6 | 0.14 |
| 9 | 3.5 | 0.39 |
| 10 | 2.7 | 0.15 |
| Ride Analysis | |||
|---|---|---|---|
| elevation change (feet) | distance (miles) | avg. grade (%) | |
| Climbing | 3163.62 | 9.52 | 6.3 |
| Descending | -3110.07 | 15.91 | -3.7 |
| Overall | 6273.68 | 25.43 | |
| Top 10 Climbs: | ||
|---|---|---|
| Rank | Gradient (%) | Distance (miles) |
| 1 | 7.2 | 0.19 |
| 2 | 5.1 | 0.27 |
| 3 | 4.6 | 0.20 |
| 4 | 4.6 | 0.20 |
| 5 | 4.0 | 0.20 |
| 6 | 3.8 | 0.23 |
| 7 | 3.5 | 0.39 |
| 8 | 3.3 | 0.23 |
| 9 | 3.2 | 0.24 |
| 10 | 3.1 | 0.17 |
| Segment Analysis | |||
|---|---|---|---|
| elevation change (feet) | distance (miles) | avg. grade (%) | |
| Climbing | 1394.26 | 4.17 | 6.3 |
| Descending | -1359.74 | 6.46 | -4.0 |
| Overall | 2754.00 | 10.63 | |
| Top 10 Climbs: | ||
|---|---|---|
| Rank | Gradient (%) | Distance (miles) |
| 1 | 6.7 | 0.14 |
| 2 | 6.5 | 0.13 |
| 3 | 5.1 | 0.27 |
| 4 | 3.8 | 0.14 |
| 5 | 3.6 | 0.15 |
| 6 | 3.3 | 0.23 |
| 7 | 3.2 | 0.24 |
| 8 | 3.1 | 0.17 |
| 9 | 3.0 | 0.17 |
| 10 | 2.6 | 0.14 |
| Segment Analysis | |||
|---|---|---|---|
| elevation change (feet) | distance (miles) | avg. grade (%) | |
| Climbing | 1769.36 | 5.35 | 6.3 |
| Descending | -1750.33 | 9.45 | -3.5 |
| Overall | 3519.69 | 14.80 | |
| Top 10 Climbs: | ||
|---|---|---|
| Rank | Gradient (%) | Distance (miles) |
| 1 | 7.2 | 0.19 |
| 2 | 6.7 | 0.15 |
| 3 | 4.6 | 0.20 |
| 4 | 4.6 | 0.20 |
| 5 | 4.0 | 0.20 |
| 6 | 3.9 | 0.14 |
| 7 | 3.8 | 0.23 |
| 8 | 3.6 | 0.14 |
| 9 | 3.5 | 0.39 |
| 10 | 2.7 | 0.15 |


The first thing you have to do for any of these rides is get to the starting place. This tab gives you everything you need to get there.
Up top is a description of the starting place. Below that is a box to enter the address of where you're coming from so you can get directions. When you've entered the address, press the 'Get directions to parking' button and it'll tell you how to get there. You'll get the usual Google Maps turn-by-turn instructions below the address box, and you'll get a corresponding line drawn on the map. Follow these directions, and you'll get to the ride.
Once you've digested the directions you will probably get tired of having the map cluttered up by them. Just hit the 'Clear parking directions from map' button and they will go away.
If you'd like to print out the driving directions, the "Get printable parking directions" button will bring up a Google Maps page with the parking directions in them that you can manipulate and print out.
Here's all the information you need to know about stops on the ride. Mostly this is where to get water and food and how far away it is. I generally prefer to list convenience stores and things like that because they're geared to deal with travelers on the go. I don't include all the restaurants and hotels and everything else, since those things aren't really necessary to help you get through the ride and there are far better resources on the web for finding those sorts of things. If there's a restaurant I particularly like eating at after a ride, I'll mention it in the overview.
You can click on any stop in the list and it'll show its info window on the map. This helpful if you're not sure where on the map a stop is.
Ride Dist.: Distance to the stop from the start of the ride. This is in miles. Sometimes I include stops that aren't actually on the route but are close to it. For those, I'll show how far off the route the stop is. These are as-the-crow-flies distances based on the point in the ride you would turn off to get to the stop, so the street distance is probably a little further to get to the stop.
Type: What type of place you're stopping at. It's mostly convenience stores, but I do add other types of places when they are very convenient or are the only things available.
Description: Anything you need to know about this stop.
Occasionally there are interesting things to check out along the ride. Here I tell you all about them.
You can click on any POI in the list and it'll show its info window on the map. This is helpful if you're not sure where on the map a POI is.
Ride Dist.: Distance to the POI from the start of the ride. This is in miles. Sometimes I include POIs that aren't actually on the route but are close to it. For those, I'll show how far off the route the POI is. These are as-the-crow-flies distances based on the point in the ride you would turn off to get to the POI, so the street distance is probably a little further to get to the it.
Description: Anything you need to know about this POI.
What does all this stuff mean? These are all the instructions necessary to complete this ride. This includes the turns and intersections of interest and which way to go when you reach them.
There are short and long instructions. You see the long instructions when you check the "Show road descriptions in list?" box. The long instructions include information about the street and any comments for the turns.
You can click on any instruction in the list and it'll show its turn info window in the map. If you click on the road information in the long instructions it'll show you its road info window in the map. This helpful if you're not sure where on the map a stop or road is.
When there's a road that the road conditions change on, such as speed, shoulder or lanes, I put the worst of the conditions down. This means narrowest shoulder, fastest speed, and most lanes of traffic. This way you can only be pleasently surprised.
Total Miles: Distance to the turn from start of ride.
Instructions: What to do at the turn. Usually it'll be RIGHT or LEFT, and occasionally STRAIGHT. The first instruction of the ride is the direction to head away from parking.
For Miles: Length of the road you turn onto.
The long instructions include all information from the short instructions plus the following:
Turn Comments: These show-up right below the turn instruction and tell you any additional information that is helpful to make the turn. I'll point out when the current road dead-ends into the next one, or when the next road T's into the current one. A 'T' intersection is when the new road dead-ends into the one you're currently on.
Road Name: Name of the road you are turning onto. When a road changes names while you're going down it, I'll put the name as "first name/second name". Also, there are lots of ways to designate country roads. Sometimes they're called "Farm Road", sometimes "Ranch Road", and sometimes just "FM" (for Farm to Market). In fact, you might see all three designations used on the same road in different places. I've just settled on calling them all "FM" since it's easier to type. Therefore, when I call something "FM", you should keep your eyes open for any of the three designations.
Road Description: Description of the road and any relevant facts about it.
Lanes: How many lanes this road has. This includes both directions, but doesn't include center turning lanes when they exist. The difference between a 1 and a 2 is sometimes a close call. I generally say there is one lane if there's no center stripe. This means that many streets that I rate as a 1 can fit two cars but aren't striped.
Shoulder: How wide the shoulder is. This is a subjective measurement that tells you how many bikes you can comfortably fit next to eachother. 1/4 means that it's just enough shoulder to tease you but isn't very helpful. 1/2 means the shoulder is wide enough for a cyclist, but that cars still need to scoot over to give you room. 1 means that a cyclist can comfortably fit in the shoulder with enough room for cars to pass without moving over. Numbers go up to 2+ for super-wide shoulders.
Traffic: How heavy the traffic is on this road. Right now this is a TOTALLY subjective measurement based on how I feel about the roads after having ridden them. In the near future I hope to switch to real traffic counts or something else that is more objective and, frankly, more useful.
Speed: Speed limit on this road. I make note of the speed limit signs and go with the fastest limit. It's not unusual for a road to change speed limits as you go down it so I choose the fastest in order to not under-estimate what the traffic is doing on the road. Some roads don't have posted speed limits, so I go with reasonable estimates. I usually guess 30 mph for residential and 40 mph for rural roads.
This is an analysis of the elevation data for the ride and for each of the segments of the ride.
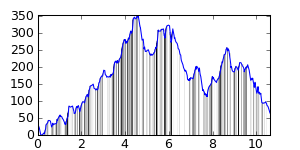
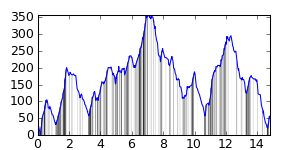
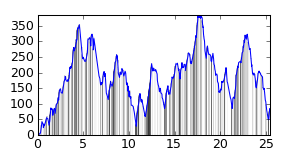
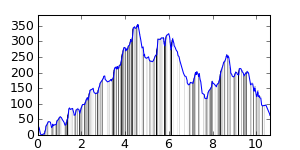
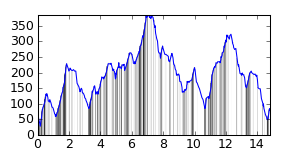
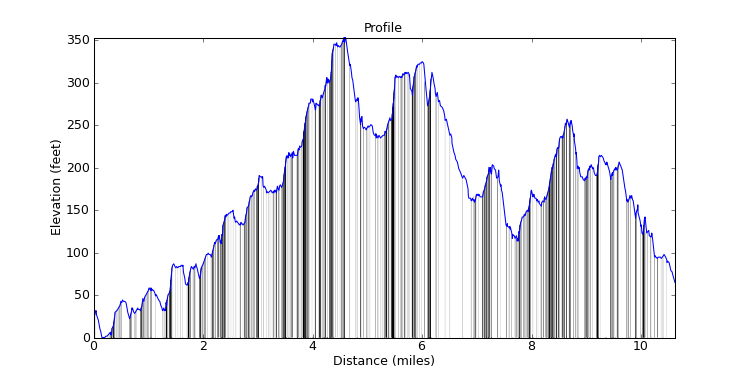
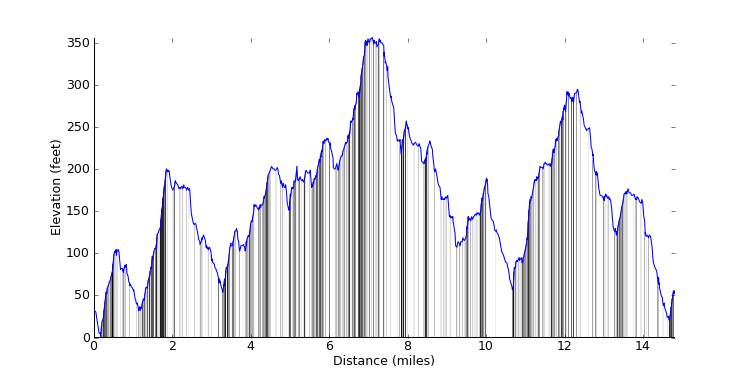
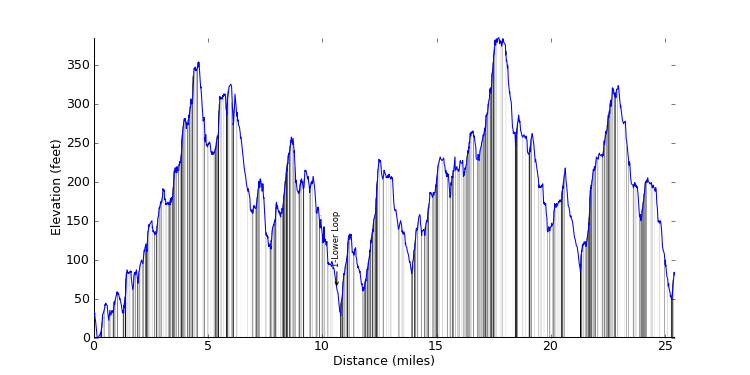
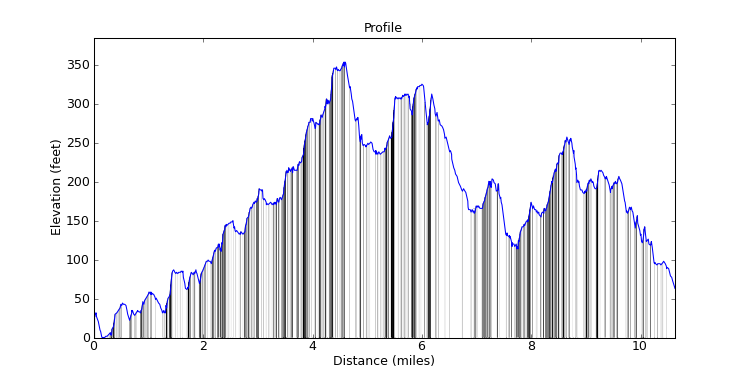
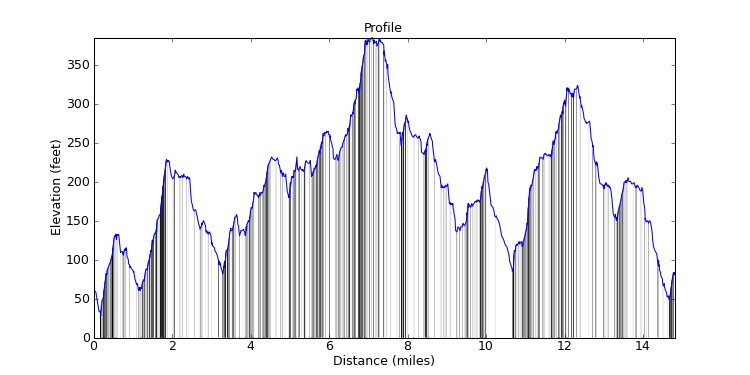
The graphs show the elevation profiles. They are shaded underneath to show how steep each part of the ride is, lighter for less steep all the way to black for very steep. I normalize the height so you see elevations from 0 to the tallest point on the ride. I don't put the true elevation above sea level because, for the San Antonio area, elevation above sea level isn't very interesting since we're never high enough to make a difference. Also, you can click on a graph to see a larger version of it. The larger graph will pop up in a separate window.
The ride and segment analyses show how much climbing and descending you'll do in the ride or segment and what the average grade is for each. The climb list tells you how steep and how long the worst climbs in the ride or segment are, and is ranked by steepness.